
.png)
.jpg?width=700&name=How%20to%20create%20your%20Business%20Process%20Maps%20(1).jpg)
Over the past 20 years I’ve consistently used two methods to map out internal business processes. The first is a pen and paper (almost always a Moleskine notebook), and the second is a whiteboard.
I rather enjoy that a Digital Cyberneticist’s toolkit are not online.
It’s inevitable, however, that whatever is drawn up in a book or on a board, gets photographed, and then gets cleaned up and created into something more ‘readable’ using an online tool.
The online tool we use right now is lucidchart.com
Personally, the ability to ‘draw out’ the process is the fastest and most effective way of generating a business process map. You may find a better approach for you, but I’ll give you the steps and stages we follow here that works well for us, and for the teams with which we work.
The 10 steps to creating your Business Process Maps
To get your started, here are some of the tips I’ve found work well...
1. Define the rules
Start with your own rules - for instance, with our own maps we’ve found it works to have the platform information at the top, and the actions beneath. We also tend to work from left to right, and top to bottom.
‘Simple stuff’ yet it will become a lot easier when you define them as rules from the outset.
2. Define the purpose
Each map you create is likely to be part of the whole, not the whole itself. As such, you’ll want to have a defined purpose for each one. This will help guide you as to what you are attempting to display for that particular map.
Note: it is also useful to have the image that is created named in the same way. This will make cataloguing easier later on.
3. Talk it through with a colleague or two
In this case, having one person lead ‘at the whiteboard’ but other people tracking the process, and inputting as you move along, will probably help you work through it quickly.
Tip: if one of your colleagues wants to take control, let them be the one at the board, and you can then take on the observer/editor role.
4. Start with the upper left
Consider: what is the first step in the process
You may well find that what you start with is actually the second step (or third, fourth etc) within a process as you are already ‘further down the line’ than the origination point that will best serve your purpose. If this happens, simply rub out and start where it makes more sense.
5. Ask: “What happens next?”
This question if the one that will drive the process forward, and the maps is simply the reflection that results.
Note: asking questions like, “what happens immediately after”, and “is there anything that happens before that next step” will help get the best process out and in front of you.
6. Use ‘boxes’
Instead of using text on it’s own, look to contain ‘platforms’ and ‘actions’ within boxes.
This means you can always have ‘process text’ outside of the boxes later on.
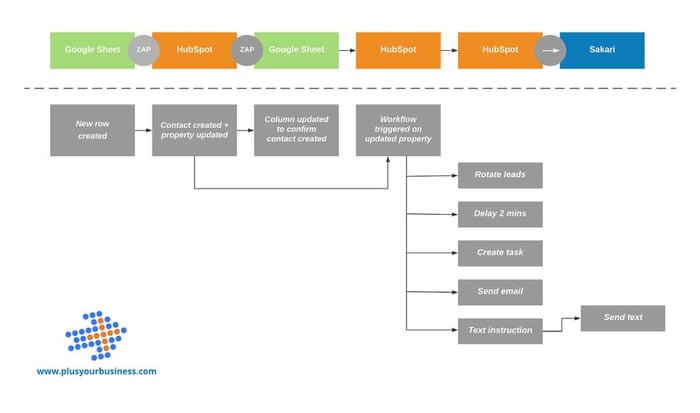
7. Review and look to add in ‘greater intelligence’
This is where your process map can move from one level to the next - with feedback loops that change, and inform, future ‘runs’ of the process e.g. adding or removing people from ‘lists’ based upon their actions through the process.
This step is somewhat platform dependent i.e. if you don’t have a platform that can deliver changes based upon action, you won’t be able to add this layer - but when you can, you’ll see the difference.
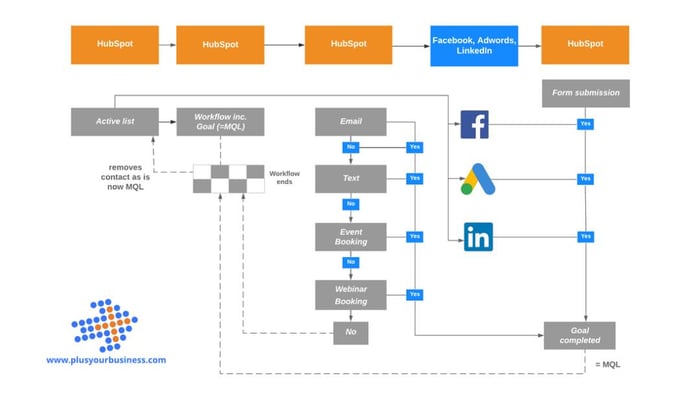
In the example above, the completion of the goal leads to the removal of a person from the list, which prevents them continuing to receive the messaging (which was only aimed at driving the goal achievement)
Note: Use ‘solid lines’ and ‘dashed lines’ differently
This is all part of the rules you decide upon at the start. For us, we’ve found using ‘solid lines and arrows’ to be ideal when there is an intentional flow, and ‘dashed lines and arrows’ when there is a flow contingent upon an action being taken.
8. Photograph it, and get it designed
A simple step - but just know that someone else designing it may well help you get the initial stages completed far quicker as removes that psychological hurdle if you don’t like that element.
Then, once ready...
9. Give it to someone who didn’t create it
This is a good test as to whether the map you’ve created can make sense to someone else within your business. They will understand the ‘words’ you are using (e.g. the names of the platforms) and the purpose behind the process won’t be totally alien to them.
If they cannot understand what is happening at certain stages, it’s probably ‘you’ and not ‘them’, and as such is within your control to edit the map until it is easier to follow.
10. Final edit and print out map
Once you have the feedback you can conduct (or instruct) about final tweaks before you print out the map.
Think about it for a second. Maps used to be physical units that we would unfold, that would be used to guide our journey. Well, this principle works well here - a printed form, stored in a file for easy access, will give you something to refer to when you are creating the process but also to refer back to if/as/when needs be.
Finally…
There are more sophisticated ways to denote various aspects of the Business Process Maps (or ‘flowcharts’ if you want to insult their intelligence!), but for our purpose you want to keep them as simple as possible for people - and too many symbols, require a ‘key’, which in turn detracts from the outcome that someone else in the business should be able to follow and interpret every aspect from the map ‘as it is’.
Get started with your own maps. It will transform your business.


.svg)
.svg)